

Herbal Healing Salve
/My Mom and I spent some time over the week-end making a healing salve from herbs harvested from her garden. With the winter chill beginning to set in, our skin can start to become dry and itchy. Why not give it a little extra TLC?
The healing properties of calendula, plantain, comfrey and lavender for skin ailments are widely known.
- Calendula Officinalis (pot marigold), is touted as a remarkable healing agent for the skin. It is widely used to promote and accelerate healing of wounds, scratches and rashes. It can also be used internally as a homeopathic remedy to heal damaged skin.
- Plantain, one of the most widespread “weeds” is safe and effective, for not only bee stings, but also for bleeding, cuts, bruises, bug bites, and itchy skin.
- Comfrey (Symphytum officinale or knitbone) is so named because it is used as a herbal remedy to knit bones, mend lacerations, and heal wounds. Also a valuable homepathic remedy, symphytum should only be used to heal broken bones once they have been set!
Lavender agustafolia, is a great antiseptic and anti-inflammatory. Used widely in aromatherapy, it also promotes relaxation.
This herbal healing salve is relatively simple to make and will make excellent addition to your natural medicine cabinet.
What you will need:
- Handful of organic calendula flowers
- Handful of organic comfrey
- Handful of organic plantain
- Lavender essential oil
- 1 1/2 cups of organic olive oil (you can also use sunflower or almond oil)
- 1 oz of Beeswax
- A double boiler (you can use a pot and a small bowl)
- Fine kitchen strainer
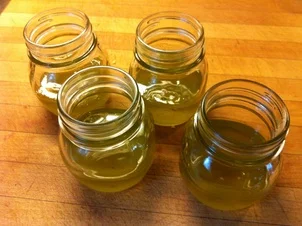
- 4 glass jars with lids
Makes 12 oz. of Herbal Healing Salve.
Creating Herbal Oil
There are two options for making the herbal oil. One takes a week or two (which if you have the time, is the best way) or you can speed up the process by gently heating the oil.
Passive Infusion
- Take your healing herbs, place them in a jar and top it up with organic olive oil. Make sure the herbs are well mixed in and that there is at least half and inch of oil sitting above the herbs.
- Place the jar in a sunny window. Shake each day. In a week or two, strain the herbs from the oil. Place in a dark glass container. Label contents and set aside. If using later, store in a cool location out of direct sunlight.

When you are in a hurry
Pour 1 1/2 cups of olive oil in a saucepan or double boiler. Put the pan on low-medium heat on the stove. If using a double boiler insert: Boil the water in the saucepan and turn it down to low-medium heat, and then pour your oil into the insert. Do not heat the oil higher to make this process go faster. This will destabilize the oil and cause rancidity.
Stir the salve herbs into the oil immediately after you pour the oil in. Stir every so often for one hour. KEEP THE TEMPERATURE LOW - you don't want to cook the herbs! The idea is to infuse the oil.
After an hour, turn off the heat. Put your kitchen strainer over a bowl. If your strainer is too porous, you can line it with a cheesecloth. Press the herbs to get all of the oil out. The idea is to separate the oil from the plant material. KEEP THE OIL and compost the leftover plant material.
Creating the Salve:
Take exactly 1 CUP of the herbal oil. If you have extra you can keep it and use it for the same healing purposes as the salve. It is very important that you have exactly 1 cup- no more, no less.
Take your cleaned sauce pan (or double broiler insert) and add 1oz of beeswax. Turn the stove to low-medium and gently melt the beeswax. When the beeswax is completely melted, add your 1 cup of herbal oil. Stir it in.
Get your salve jars ready and place them by the stove.
Once the beeswax and the herbal oil is all melted together, pour the contents into a measuring cup with a spout (such as a glass Pyrex measuring cup).
Quickly (but calmly) pour the salve into your jars. If you mixture hardened too quickly you can melt it and pour it again. Add 8-12 drops of lavender essential oil to each jar. Let the jars sit out until they have hardened. Once cooled, put the lids on them. Be sure to label the jar.
Apply and enjoy!